|
Tool list
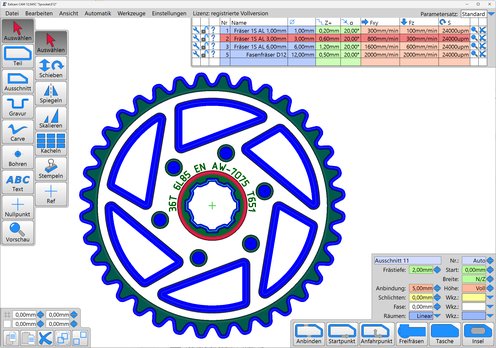
- The tool list works similar to a spreadsheet and is able to manage as many tools as you like...
- The currently selected tool is shaded red and will be assigned to new toolpaths automatically...
- Different toolpaths may be assigned different tools...
You can also do this subsequently by reselecting the toolpath and then clicking the desired tool...
The Colums of the tool list:
| / Tool number: |
- Whether you need to assign numbers to your tools depends on the CNC controller you use...
- If your controller doesn't require tool numbers (like e.g. Estlcams integrated controller) you can just ignore this column or even hide it...
- If your controller requires them mainly for formal reasons you can assign just any number but make sure you don't use numbers twice...
- Controllers with tool management however require the numbers in Estlcam to match exactly the numbers in the controllers internal list...
In some cases the controller may also override parameters like e.g. feeds with the values of its internal list - so the according colums
in Estlcam will become irrelevant...
| /Tool name: |
- You can choose any name you like...
- The name will appear in the final CNC program to help you selecting the right tool - so it is a good Idea to use meaningful names...
| / Tool diameter: |
- I think this one is self-explanatory ;-)
| / Maximum depth increment per pass: |
- Depending on material and machine tools are only able to cut a certain depth at once - otherwise precision and surface finish will suffer
and if it comes to the worst the tool may even break...
- If you like to cut deeper than specified here Estlcam will create multiple passes to reach the desired depth....
- Some guide values:
- Very soft materials like e.g. styrene foam and balsa wood: 1 to 5x tool diameter
- Soft materials like e.g. softwood and plastics: 0,5 to 2x tool diameter
- Medium hard materials like e.g. hardwood: 0,25 to 1x tool diameter
- Hard materials like e.g. aluminum and brass: 0,1 to 0,5x tool diameter
- (This column has nothing to do with desired or maximum cutting depth, tool length or cutting edge length)...
| / Cut feed : |
- "Regular" feed / machining speed in the X/Y plane...
- The "right" feed is unfortunately heavily depending on material, tool type, availabe RPM range, and stiffness of your machine.
Manufacturer information and calculators usually assume heavy, professional machines weighing tons and are rarely applicable to small machines.
You'll usually need to experiment a bit to gain experience...
| / Plunge feed: |
- Similar to above but used for cutting deeper into the material along the Z-axis...
- Almost every tool cuts much worse downwards than sidewards - accordingly plunge feeds usually need to be much slower than cutting feeds...
| / RPM: |
- This column is only important if your controller has actual control to set spindle RPM - otherwise you can just ignore it...
- Similar to feedrates RPM depends on many factors - you'll usually need to experiment a bit and gain experience...
| / Plunge angle: |
- Usually Estlcam cuts vertically (90°) into the material - however some tools are so bad at cutting downwards that this would be a bad choice or even
downright impossible...
- In this column you can specify a lower angle (e.g. 10°) to make the tool cut along a flat ramp into the material...
- But be careful: this obviously will not work for drill holes or extremely tight and short toolpaths...
| / Tool tip angle: |
- Tip angle for engraving bits Estlcam requires for some special text- and picture engraving operations...
- The angle for regular tools is 180°...
| / Stepover: |
- Distance between the lines for pocket milling as percentage of the tool diameter...
- Be careful: there will always be situations where the tool cuts at 100% of its diameter (e.g. the first line or whenever the next line
is longer than the last). The only reliable way to limit tool load is the depth increment per pass column...
| / Trochoidal milling: |
- 0% = "regular" milling (left picture)...
- If you enter values larger than 0% the tool will start to circle around the toolpath in a spiral-shaped fashion (right picture).
With each turn it will move forward by the distance entered here (as percentage of tool diameter). Cutting width increases by 50%...
- Trochoidal milling reduces cutting forces and temperature and chips will be removed much better.
It is mainly used for hard and difficult to machine materials like steel / stainless steel (values between 1-5%) - even cheap hobby machines are often able to do this with surprisingly good results.
Due to lower temperatures and improved chip removal it is also useful for soft materials with the tendency to smear up the tool like plastics (5-20%), aluminum and copper (3-10%).
- Usually you can use very large depth increments (column 4).
| / Search: |
- Clicking at a tools magnifier symbol will select every toolpath using this tool...
- You can use it e.g. to simply replace one tool with another: Click at the magnifier symbol of the tool you like to replace, then click at the tool it should
be replaced with...
| / Delete tool: |
- Deletes the tool unless it is still assigned to a toolpath - in this case it can't be deleted...
New tool:
- To create a new tool just click at the lowermost, empty row and start to fill it out...
- You can create as many tools as you like...
Saving tool lists:
|
- It makes sense to create differents tool lists for different materials...
- You can open and save tool lists using the tool lists "File" menu...
- Your prefered tool list can be saved as standard by "File -> Save as standard" and restored at any time by "File -> Restore standard"...
|
Hide columns:
|
- You can hide columns you don't need using the tool lists "View" menu...
- You can also hide the units to make the list shorter...
|
Sorting tools:
|
- You can sort your list using the "Sort" menu...
|
|